May 29, 2026 | Blog
Curing UV adhesives through clear plastic sounds simple.
Apply the adhesive, shine UV light through the plastic, and let the bond cure.
In practice, it is not always that easy.
Many manufacturers run into the same problem: the adhesive cures perfectly in open air, but once it is placed between two plastic parts, the cure becomes weak, tacky, inconsistent, or incomplete. The issue is usually not the adhesive alone. It is often the combination of adhesive chemistry, plastic material, wavelength, UV intensity, exposure time, distance, and part geometry.
If you are trying to cure UV adhesives through clear plastic, the key question is not just whether the plastic looks transparent. The real question is whether that plastic transmits enough of the correct UV wavelength to reach and cure the adhesive.
That distinction matters.
A material can appear clear to the human eye while still blocking the UV energy your adhesive needs.
Why Clear Plastic Can Still Block UV Light
Visible transparency and UV transmission are not the same thing.
A clear plastic part may allow visible light to pass through, but that does not mean it allows ultraviolet light to pass through efficiently. Some plastics absorb or filter UV light, especially at shorter wavelengths. Others may transmit certain UV wavelengths better than others.
This is why one UV adhesive application may cure easily through one clear plastic, but fail through another.
The plastic may look the same to an operator, but the UV curing process sees something very different.
Common materials used in bonding applications include acrylic, polycarbonate, PVC, PET, ABS blends, polystyrene, and other engineered plastics. Each material can behave differently under UV exposure. Even additives, colorants, coatings, stabilizers, and thickness changes can affect how much UV energy reaches the adhesive.
For manufacturers, this means the curing setup should be tested through the actual production material, not just on an open sample of adhesive.
Start With the Adhesive’s Required Wavelength
Before choosing a UV curing system, start with the adhesive.
UV adhesives are formulated to cure at specific wavelength ranges. Some materials respond well to 365 nm UV. Others are designed for longer wavelengths such as 385 nm, 395 nm, or 405 nm. Some adhesives work best with broad-spectrum UV lamp systems.
If the adhesive requires a wavelength that your plastic blocks, the cure will struggle no matter how long you expose it.
Longer exposure time can sometimes help, but it cannot fully solve a wavelength mismatch. If the plastic does not transmit the correct wavelength, the adhesive may never receive enough usable energy to cure properly.
That is why the first step is simple:
Check the adhesive data sheet. Identify the recommended wavelength. Then test whether the plastic transmits that wavelength well enough for the bond line to cure.
Why 365 nm Is Common, But Not Always Best Through Plastic
Many UV adhesives are associated with 365 nm curing because 365 nm has long been a common wavelength for industrial UV adhesive applications.
However, some clear plastics reduce transmission at shorter UV wavelengths. In those cases, a longer wavelength LED source, such as 385 nm, 395 nm, or 405 nm, may provide better penetration through the plastic, depending on the adhesive formulation and material.
This does not mean longer wavelengths are always better.
The adhesive still has to respond to that wavelength. A 395 nm LED system will not help if the adhesive chemistry is not designed to cure effectively at 395 nm. The goal is to match three things:
The adhesive’s cure response
The plastic’s UV transmission
The curing system’s wavelength and intensity
When all three are aligned, curing through clear plastic becomes much more predictable.
Check the Plastic Thickness
Plastic thickness can make or break the process.
A thin clear plastic window may transmit enough UV energy for a fast cure. A thicker molded component may absorb more energy before the light ever reaches the adhesive. Even if the material is technically UV-transmissive, increased thickness can reduce the intensity at the bond line.
This matters in applications such as:
Medical device assembly
Tube and connector bonding
Sensor housings
Optical components
Fluidic devices
Electronics enclosures
Clear covers and windows
Display bonding
Plastic manifolds
Laboratory equipment
If the UV light has to pass through a thick plastic wall before reaching the adhesive, the curing process may require a higher-intensity source, a longer exposure, a different wavelength, or a revised part design.
Bond Line Access Matters
Curing through clear plastic becomes harder when the adhesive is hidden by geometry.
A flat, transparent cover over a thin adhesive layer is usually easier to cure than a deep joint, curved part, or shadowed bond line. If the UV light cannot reach the full adhesive area evenly, one section of the bond may cure while another remains soft or under-cured.
This is especially common in tubing, connectors, molded plastic parts, and small medical or electronic assemblies.
In these cases, manufacturers may need to expose the part from multiple angles, rotate the assembly, use a fixture, or choose a UV system with the right output pattern for the part geometry.
A focused UV spot curing system, such as the Uvitron SunSpot 2, can be useful when the adhesive area is small and needs targeted UV exposure. For broader parts or fixture-based curing, a UV flood curing system such as the IntelliRay, SkyRay, or NovaRay may be a better fit.
The right choice depends on the bond area, part shape, material, adhesive, and production workflow.
Spot Curing Through Clear Plastic
UV spot curing is often used when the bond area is small, precise, or difficult to access.
A spot curing system delivers UV energy to a defined area, usually through a focused output or light guide. This allows manufacturers to target the adhesive location rather than exposing the entire part.
Spot curing can be a strong option when:
The bond area is small
The adhesive is applied to a precise joint
The part needs manual positioning before cure
The cure area is accessible from one direction
The process requires controlled exposure
Operators need repeatable timing and intensity
For example, the Uvitron SunSpot 2 is designed for precise UV spot curing applications where controlled, focused UV energy is needed. It can be a strong fit for adhesive bonding, component assembly, R&D testing, and production environments that require localized curing.
Spot curing is not automatically the answer for every through-plastic application, but it is often the right place to start when the bond line is small and accessible.
Flood Curing Through Clear Plastic
UV flood curing is useful when the adhesive area is larger or when multiple parts need to be exposed at once.
A flood curing system exposes a wider area to UV light. This can work well when parts are placed in a fixture, when several assemblies need to be cured at the same time, or when a larger bond area needs broad, even exposure.
Uvitron’s IntelliRay and SkyRay systems are practical options for manufacturers evaluating flood curing workflows. For larger-area LED flood curing, the NovaRay can be considered when the application requires high-intensity LED output over a broad curing area.
Flood curing may be a better fit when:
The part has a larger adhesive area
Multiple assemblies are cured together
The process uses a fixture or tray
The bond line benefits from wide-area exposure
The production workflow needs batch curing
The part geometry allows broad UV access
For enclosed curing environments, the Uvitron Rayven can also support safer, more controlled curing workflows by providing a light-shielding chamber for compatible Uvitron systems.
When a Portable UV System Makes Sense
Not every UV adhesive application happens at a fixed production station.
Some manufacturers need a portable or flexible UV curing system for larger parts, irregular assemblies, maintenance work, field service, or lower-volume production. In those cases, a portable flood curing system such as the Uvitron PortaRay may be useful.
The PortaRay is designed for high-power portable UV curing, making it a practical option when the part cannot easily be brought to a benchtop curing station.
For through-plastic adhesive applications, a portable system may be considered when:
The assembly is too large for a chamber
The cure area changes from part to part
The process is manual or low-volume
The part needs to be cured in place
The production setup requires flexibility
As with any UV adhesive process, the material and bond line still need to be tested to confirm that enough UV energy reaches the adhesive.
Common Reasons UV Adhesives Do Not Cure Through Clear Plastic
If your adhesive cures in open air but not through the plastic part, one or more of these issues may be the cause.
The Plastic Is Blocking the Wavelength
The most common issue is poor UV transmission. The plastic may look clear but still absorb the wavelength required by the adhesive.
The Adhesive Is Not Matched to the Light Source
A UV LED system and adhesive need to be compatible. If the adhesive is designed for a different wavelength range, cure performance may suffer.
The Plastic Is Too Thick
Even a UV-transmissive plastic can reduce the amount of energy reaching the adhesive if the part is too thick.
The Cure Area Is Shadowed
Curved parts, deep joints, lips, edges, and internal features can block UV light from reaching the full bond line.
The Light Source Is Too Far Away
Distance affects intensity. If the UV source is too far from the part, the adhesive may not receive enough energy to cure fully.
The Exposure Time Is Too Short
If the adhesive receives the correct wavelength but not enough total energy, the bond may remain tacky or weak.
The UV System Is Not Powerful Enough
Some applications require higher intensity, especially when curing through plastic, thicker materials, or challenging geometries.
The Part Needs Exposure From Multiple Angles
A single exposure direction may not reach the full adhesive area. Rotation or multi-angle curing may be needed.
How to Build a Better UV Curing Process
The best way to solve through-plastic UV curing problems is to test the process methodically.
Start with the adhesive data sheet. Confirm the recommended wavelength and cure energy. Then test the adhesive through the actual plastic material at the actual thickness used in production.
From there, adjust one variable at a time.
Wavelength
Intensity
Exposure time
Working distance
Part orientation
Fixture design
Number of exposures
Cure angle
Adhesive amount
Bond line thickness
The goal is not just to get one good sample. The goal is to create a repeatable curing process that can work in production with consistent results.
If the process needs to scale, document the setup clearly. Operators should know the required exposure time, lamp distance, part position, fixture orientation, and acceptable cure criteria.
Choosing the Right Uvitron System
Uvitron International builds UV curing systems for manufacturers working with adhesives, coatings, inks, resins, and other UV-curable materials.
For curing UV adhesives through clear plastic, the right Uvitron system depends on the application.
The SunSpot 2 is a strong option for precise spot curing and small adhesive areas.
The IntelliRay and SkyRay systems are useful for UV flood curing applications where a broader cure area is needed.
The NovaRay provides a high-intensity LED flood curing option for larger-area applications where LED output is preferred.
The PortaRay is a portable UV flood curing system for applications that require flexibility or in-place curing.
The Rayven provides a light-shielding curing chamber for safer, more controlled benchtop curing workflows with compatible systems.
For manufacturers that need something application-specific, Uvitron can also help evaluate custom UV curing setups based on the adhesive, plastic, part geometry, and production requirements.
May 29, 2026 | Blog
Catheter manufacturing depends on small, precise, repeatable bonding steps.
Whether the application involves bonding hubs, tips, balloons, luers, connectors, or tubing assemblies, manufacturers need a process that can hold tight tolerances without slowing production down. Adhesive selection matters, but the curing method is just as important.
That is why UV curing is commonly considered for catheter bonding applications.
With the right UV-curable adhesive and the right curing system, manufacturers can position components accurately, apply UV light, and cure the bond in seconds. This can reduce handling delays, improve production flow, and create a more controlled assembly process than many traditional bonding methods.
But UV curing is not simply a matter of shining a lamp at a part.
Catheter bonding often involves curved surfaces, small bond areas, transparent or semi-transparent materials, shadows, varying wall thicknesses, and strict quality expectations. To get reliable results, manufacturers need to understand how UV wavelength, intensity, exposure time, adhesive chemistry, and part geometry all work together.
Why UV Curing Is Used in Catheter Bonding
Catheter assemblies often require fast, clean, and accurate bonding. Traditional adhesives can work well, but they may require longer cure times, mixing, fixturing, or extended handling windows.
UV-curable adhesives offer a different workflow.
The adhesive remains uncured until exposed to the correct UV light. This gives operators time to align the part, check placement, and control the assembly before initiating the cure. Once exposed to UV energy, the adhesive can cure rapidly, often in seconds depending on the material, bond design, and curing system.
For catheter manufacturers, this can be useful in applications such as:
Hub-to-tube bonding
Tip forming and bonding
Balloon catheter assembly
Luer and connector bonding
Strain relief bonding
Tubing joint reinforcement
Sensor and wire attachment
Transparent plastic component bonding
Small-area adhesive curing
The main advantage is controlled speed. Manufacturers can cure the adhesive when they are ready, rather than working around the timing limitations of a two-part or room-temperature cure material.
The Biggest Challenge: Getting UV Energy to the Bond Line
In catheter bonding, the adhesive is often placed in a small area between two components. The UV light needs to reach the adhesive with enough energy to complete the cure.
That sounds simple, but several factors can affect the result.
The tubing material may absorb or block certain wavelengths. The adhesive may be partially hidden by the part geometry. The bond line may wrap around a curved surface. The assembly may need to be rotated or exposed from multiple angles. A clear material may transmit UV well, while another plastic may reduce the amount of energy reaching the adhesive.
This is why UV curing trials are so important.
A curing system that works well for one catheter assembly may not be ideal for another. The right setup depends on the adhesive, the substrate, the bond location, and the production requirements.
UV Spot Curing for Catheter Bonding
UV spot curing is often a strong fit for catheter bonding because the cure area is usually small and specific.
A UV spot curing system delivers focused UV energy through a light guide or optical output. This allows operators to target the adhesive area directly without exposing the entire part to unnecessary light.
Spot curing can be especially useful when:
The bond area is small
The assembly requires precise light placement
The operator needs manual control
The process uses fixtures or jigs
The adhesive is applied to a defined joint
The part geometry limits access to the bond line
For catheter assemblies, spot curing may be used at tubing joints, hubs, connectors, or other localized bond points. The goal is to deliver enough UV energy to the adhesive without overheating or overexposing nearby materials.
UV Flood Curing for Larger or Multi-Part Fixtures
UV flood curing may be useful when several parts need to be cured at once or when the adhesive area is broader.
A flood curing system exposes a larger area to UV light. This can work well for batch processing, fixture-based assembly, or parts that require more complete area coverage.
For catheter manufacturing, flood curing may be considered when:
Multiple assemblies are cured together
A fixture holds parts in a repeatable position
The cure area is larger than a single spot
The process benefits from broad exposure
The production workflow requires batch curing
Flood curing can improve throughput when the application is designed around consistent part placement and controlled exposure.
Why Wavelength Matters
Not every UV-curable adhesive responds to the same wavelength.
Some adhesives are designed for traditional broadband UV lamps. Others are optimized for LED wavelengths such as 365 nm, 385 nm, 395 nm, or 405 nm. The correct wavelength depends on the adhesive chemistry and how the UV light interacts with the materials being bonded.
In catheter bonding, wavelength selection becomes even more important because the light may need to pass through tubing or plastic before reaching the adhesive.
If the material blocks too much UV energy, the adhesive may not cure properly. If the wavelength does not match the adhesive requirements, longer exposure may not solve the problem.
Manufacturers should always confirm the adhesive’s recommended wavelength and test the cure through the actual production materials, not just in open-air samples.
Intensity and Exposure Time
UV curing depends on both intensity and time.
Intensity is the amount of UV power reaching the surface. Exposure time is how long the adhesive receives that energy. Together, they determine the UV dose delivered to the material.
For catheter bonding, this matters because under-curing can lead to weak bonds, while excessive exposure can create unnecessary heat, material stress, or process inefficiency.
A reliable curing process should define:
Lamp or LED type
Wavelength
Working distance
Exposure time
UV intensity
Part orientation
Fixture position
Number of exposures
Acceptable cure criteria
Once these details are validated, the process becomes easier to repeat on the production floor.
Common Catheter Bonding Issues UV Curing Can Help Solve
UV curing is often considered when manufacturers are trying to solve production problems such as slow adhesive cure times, inconsistent bond strength, difficult handling, or excessive work-in-progress.
For example, if a catheter assembly needs to sit in a fixture for several minutes while an adhesive sets, that fixture becomes a bottleneck. UV curing may allow the operator to align the part, cure the bond quickly, and move the assembly forward.
If a process depends heavily on operator timing, UV curing can help create a more defined production window. The adhesive can be positioned first, then cured on command.
If parts are delicate or heat-sensitive, UV curing may also help reduce reliance on elevated-temperature curing methods.
What Manufacturers Should Test Before Scaling Production
Before moving a UV curing process into full production, manufacturers should test the actual assembly conditions as closely as possible.
That includes the real adhesive, real substrate materials, real bond geometry, real fixture design, and real exposure distance.
Important testing questions include:
Does the UV light reach the full bond line?
Does the adhesive cure through the tubing or plastic?
Is the bond strong enough after cure?
Does the part need to be rotated during exposure?
Does the process create unwanted heat?
Is the cure consistent across multiple operators or fixtures?
Can the same exposure be repeated reliably?
Does the process meet internal quality requirements?
The goal is not just to cure one sample successfully. The goal is to build a curing process that works repeatedly in production.
Choosing a UV Curing System for Catheter Bonding
The best UV curing system depends on the specific catheter assembly.
A small, localized bond may call for a UV spot curing system. A fixture holding multiple assemblies may benefit from flood curing. A production line may require a custom setup with shielding, interlocks, timers, or automation support.
Manufacturers should consider:
Bond size
Adhesive type
Recommended wavelength
Substrate UV transmission
Required cure speed
Production volume
Operator workflow
Fixture design
Safety requirements
Validation needs
The system should be selected around the application, not the other way around.
Uvitron’s Role in Catheter Bonding Applications
Uvitron International builds UV curing systems for manufacturers that need practical, reliable curing equipment for real production environments.
For catheter bonding and other medical device assembly applications, Uvitron can help manufacturers evaluate whether a spot, flood, LED, or custom UV curing setup makes sense for the process. The right system depends on the adhesive, the material, the geometry, and the production goal.
UV curing can be a powerful tool for catheter manufacturers, but only when the system is matched carefully to the application.
If your team is evaluating UV curing for catheter bonding, tubing assembly, medical device adhesives, or precision component bonding, Uvitron can help review the application and recommend a curing approach built around your production needs.

Jun 11, 2025 | Blog
In manufacturing, consistency isn’t optional. Whether you’re bonding, coating, or encapsulating, the curing process is where precision becomes performance. Yet too many engineers are still relying on outdated systems that offer little more than an on/off switch. That isn’t control. It’s a compromise.
The Problem with “Good Enough” Curing
Engineers are built to solve problems, not tolerate guesswork. Yet when a UV curing system delivers uneven exposure, fluctuating intensity, or lacks real-time feedback, it leaves too much to chance. Was the part fully cured? Was the exposure consistent? Has the output degraded?
Without data, there’s no way to be sure. And in industries like medical device manufacturing, aerospace, or electronics, uncertainty is a risk no one can afford.
That’s why more engineers are turning to systems like the NovaRay UV flood curing solution. Designed to deliver both power and precision, it provides the control and visibility modern applications demand.
Visibility, Repeatability, Accountability
In high-performance manufacturing, a reliable UV light source is just the beginning. Engineers need insight into what’s actually happening during every cure. They need visibility into output, repeatability across batches, and accountability built into the process.
That means real-time monitoring. That means tracking UV intensity, exposure duration, and system performance over time. It means having a digital record of every cycle for traceability and compliance. In today’s world of Six Sigma standards and ISO-certified operations, this level of control isn’t a luxury. It’s the baseline.
That’s exactly why systems like the NovaRay UV flood curing system are becoming the new standard. With integrated monitoring, touchscreen controls, and programmable settings, NovaRay gives engineers the tools to ensure every part is cured to spec, every time.
Raising the Standard
The expectations for UV curing systems have changed. It’s no longer enough for a system to simply work. Engineers need tools that work intelligently, adapt to evolving production demands, and provide actionable insights.
The next generation of curing systems isn’t just more powerful, it’s smarter. We’re seeing a shift toward full integration, with systems that include built-in monitoring, programmable settings, and automated feedback. These features are not optional. They’re essential for reducing material waste, identifying issues before they become defects, and ensuring consistent results from one cycle to the next.
In complex, high-stakes environments, guesswork is expensive. Whether you’re scaling up production or maintaining tight tolerances in a regulated industry, control and precision are the only way forward.
That’s where the NovaRay UV flood curing system fits in. With advanced features like digital timing control, real-time intensity feedback, and a fully integrated touchscreen interface, it puts engineers in full command of the curing process. It doesn’t just raise the standard, it sets it.
What That Looks Like in Practice
So what does real control actually look like in a UV curing system?
It starts with a touchscreen interface that lets you adjust intensity, exposure time, and shutter position with complete precision. Every parameter is at your fingertips, giving you the power to tailor the curing process to each application without relying on outdated knobs or external timers.
It means having a system that actively monitors each cycle, verifies the UV dose delivered, and alerts you the moment something shifts out of spec. No more reactive troubleshooting. You know what’s happening the moment it happens.
It also means built-in repeatability. You can program profiles, save settings, and ensure that every part on the line receives the same exposure as the last—without deviation. That kind of consistency is only possible with intelligent integration.
This was the blueprint behind the NovaRay UV flood curing system. It wasn’t developed in isolation. It was built in direct response to years of feedback from engineers asking for more visibility, more accuracy, and more control.
The result is a system that doesn’t just emit UV light. It gives you full command over the process, so you can meet higher standards without compromise.
Feb 14, 2025 | Blog
Short answer: No. Not all adhesives cure under UV light.
UV curing is widely used in manufacturing, electronics, and medical applications because it offers a fast and efficient way to bond materials. However, not every adhesive responds to UV exposure. Some adhesives require air, moisture, or chemical mixing to cure, and UV light alone won’t trigger their hardening process. Using the wrong adhesive or the wrong type of UV light can result in weak bonds, incomplete curing, or total adhesive failure, leading to wasted materials and increased costs.
What makes an adhesive UV-curable?
For an adhesive to cure under UV light, it must contain photoinitiators. These are compounds that absorb UV energy and start the polymerization process, which changes the adhesive from a liquid to a solid. Without photoinitiators, UV exposure won’t have any effect on the adhesive’s bonding properties.
Even among UV-curable adhesives, there are differences in how they react. Some require specific wavelengths or intensities to cure properly. If the UV source doesn’t match the adhesive’s requirements, curing may be slow, uneven, or ineffective.
Common adhesives that cure under UV light
Acrylic-based UV adhesives are widely used in industries that require strong, transparent bonds, such as glass bonding, optics, and electronics. These adhesives offer excellent clarity and durability, making them ideal for applications where aesthetics and strength are both important.
Epoxy-based UV adhesives provide strong structural bonds and are commonly used in medical and industrial applications. They offer high chemical and temperature resistance, making them suitable for environments that require long-term durability under demanding conditions. Some epoxy formulations also include dual-cure properties, allowing them to set with UV exposure and continue curing over time for enhanced performance.
Cyanoacrylate UV adhesives combine the fast bonding properties of traditional cyanoacrylates with the added benefit of UV curing. While they initially bond on contact, exposing them to UV light helps achieve full strength and improves the adhesive’s durability. This makes them useful for applications requiring both immediate adhesion and additional curing reinforcement.
Silicone-based UV adhesives are designed for flexible, high-temperature applications. They maintain their elasticity after curing, making them a good choice for bonding materials that experience movement, expansion, or thermal cycling. These adhesives are commonly used in electronics, automotive, and aerospace applications where flexibility and resistance to extreme temperatures are needed.
What about standard glues and epoxies?
Everyday adhesives like super glue, wood glue, and conventional two-part epoxies won’t cure under UV light unless specifically designed for UV activation. These adhesives rely on other curing mechanisms, such as exposure to air, moisture, or chemical mixing, to harden. Without these conditions, UV light alone won’t trigger the bonding process, leaving the adhesive ineffective.
Can any UV light cure adhesives?
No. The type of UV light is just as important as the adhesive itself. UV-curable adhesives are formulated to respond to specific wavelengths, and using the wrong type of UV light can result in incomplete or failed curing. The most commonly used wavelengths for UV curing include:
- 365 nm (longwave UVA) – The industry standard for most UV curing applications, providing deep penetration and reliable bonding.
- 395 nm (higher intensity UVA) – Used in certain applications for faster curing, particularly where increased intensity helps speed up production.
- 250-320 nm (UVB & UVC range) – Used in specialized curing processes, often for coatings or adhesives requiring stronger surface activation.
Choosing the correct wavelength ensures a proper cure, preventing weak bonds and ensuring the adhesive reaches its full performance potential.
What happens if you use the wrong UV light?
If the UV light is too weak, the adhesive won’t cure at all, leaving it in a liquid state and failing to bond the materials. If the wavelength doesn’t match the adhesive’s formulation, the curing process may be incomplete or uneven, resulting in weak spots that compromise the bond’s strength. On the other hand, if the intensity is too high, it can generate excessive heat, potentially damaging the adhesive or the materials being bonded. Using the correct UV light is essential to achieving a proper, reliable cure.
How to choose the right UV curing setup
Selecting the right UV curing system starts with understanding the adhesive’s specifications. If an adhesive isn’t explicitly formulated for UV curing, no amount of UV exposure will make it harden. Even when an adhesive is UV-curable, the wavelength of the curing system must match the adhesive’s requirements to ensure a complete and reliable bond. Using a system with too little intensity can result in poor curing, while a high-intensity system ensures a fast, even cure without compromising the integrity of the bond.
The size of the curing area is another critical factor. Different applications require different curing methods, whether it’s a spot UV system for precision curing, a flood UV system for large surfaces, or a conveyor UV system for high-throughput production lines. At Uvitron International, we manufacture a range of UV curing systems tailored to meet these specific needs. Our in-house engineered solutions ensure that you get the right intensity, wavelength, and curing area coverage for your adhesive and production process. If you need guidance on selecting the right system, our team can help match you with the best UV curing technology for your application.
Jan 14, 2025 | Blog
UV curing is designed to provide a fast, efficient, and precise method for bonding, coating, and sealing materials. When everything is working correctly, the process delivers strong, durable results in a fraction of the time compared to traditional curing methods. However, if your adhesive isn’t curing as expected, there’s always a reason behind it.
You might notice that the adhesive remains tacky, takes longer than expected to harden, or forms weak bonds that don’t hold up under stress. In some cases, it may not cure at all. These issues can disrupt production, increase waste, and lead to costly rework.
Understanding why your UV curing process isn’t delivering the expected results is the first step toward fixing the problem. In most cases, the cause can be traced to one or more of the following factors, all of which can be adjusted to improve curing performance.
The UV light source doesn’t match the adhesive
Not all UV adhesives react to the same type of UV light, and using the wrong wavelength can result in an incomplete or failed cure. UV-curable adhesives are formulated to respond to specific wavelengths, typically in the UVA range, but the required wavelength can vary depending on the adhesive’s chemistry.
Some adhesives require 365 nm, which is ideal for deep penetration and thorough curing, while others respond better to 395 nm, which delivers higher intensity and can speed up the curing process. If your UV light source doesn’t align with the adhesive’s formulation, the photoinitiators in the adhesive may not activate properly, leading to weak bonds, surface tackiness, or no cure at all.
Even if the wavelength is correct, intensity plays a crucial role. A low-intensity UV source may fail to provide enough energy to complete the curing process, while an overly intense source can cause overheating or degradation of the adhesive.
To ensure a reliable cure, it’s essential to use a UV curing system that matches the adhesive’s requirements. Uvitron’s UV curing solutions are designed to deliver the precise wavelength and intensity needed for each application, eliminating guesswork and ensuring a fast, complete, and consistent cure. If you’re unsure whether your UV system is compatible with your adhesive, selecting a system with adjustable wavelength and intensity settings can help optimize performance.
Insufficient UV intensity
If the UV light isn’t strong enough, the adhesive may only partially cure or remain tacky, leading to weak bonds and unreliable performance. This issue often arises when using underpowered lamps, aged UV bulbs with diminished output, or systems that aren’t designed to deliver the required intensity for a full cure.
UV curing relies on a precise balance of wavelength and intensity to activate the photoinitiators within the adhesive. Even if the correct wavelength is being used, inadequate intensity means the adhesive won’t receive enough energy to complete the polymerization process. As a result, bonds may feel soft, sticky, or weak, making them susceptible to failure under stress.
Another factor to consider is distance from the light source. If the UV lamp is positioned too far from the adhesive, the intensity of the UV energy reaching the surface will decrease, leading to an uneven or incomplete cure. Similarly, if the adhesive is applied too thickly, UV light may not penetrate deep enough to cure the entire layer, leaving the bottom portion uncured.
High-intensity UV curing systems, like those from Uvitron, ensure that adhesives receive the necessary energy for a complete and consistent cure. Our systems are designed to deliver reliable, high-output UV exposure, reducing the risk of weak bonds, incomplete curing, and costly rework. If curing performance is inconsistent, checking the intensity levels and adjusting the system’s power output or positioning can significantly improve results.
Incomplete UV exposure
For UV curing to be effective, the adhesive or coating must receive direct and even exposure to the correct wavelength of UV light. Any obstruction or inconsistency in exposure can lead to partial curing, weak bonds, or surface tackiness.
One of the most common reasons for incomplete curing is shadows created by the materials being bonded. If part of the adhesive is hidden beneath an opaque or semi-transparent surface—such as metal, plastic, or a dense substrate—the UV light won’t be able to reach it. This often results in the top layer curing while the underlying adhesive remains liquid or weak, leading to bond failure.
Uneven application of adhesive or coating can also cause problems. If the material is applied too thickly, the UV light may only penetrate the surface, leaving deeper layers undercured. This is especially important when working with formulations that rely on specific exposure times or intensities for full polymerization.
Additionally, curing setup and lamp positioning play a crucial role. If the UV light source isn’t positioned correctly, some areas may receive more exposure than others, leading to inconsistent curing across the bonded surface. Rotating fixtures, multiple light sources, or flood curing systems can help eliminate these inconsistencies.
Uvitron’s flood curing systems and adjustable positioning options ensure uniform exposure, even for complex or irregularly shaped parts. These systems deliver consistent UV intensity across the entire curing area, reducing the risk of shadowing and incomplete bonds. Proper system setup, combined with the right adhesive and UV wavelength, ensures reliable curing and long-lasting performance.
Curing time is too short
UV curing is designed to be fast, but cutting the process short can lead to incomplete polymerization, resulting in weak bonds, tacky surfaces, or poor adhesion. Even when using a high-intensity UV system, adhesives and coatings still require a specific amount of exposure time to reach full strength. If the curing process is rushed, the adhesive may only partially react, leading to failures in performance.
Each UV-curable material has an optimal curing time, which depends on factors such as adhesive formulation, thickness, and the intensity of the UV light source. Some materials may cure within seconds, while others require a longer exposure to fully harden. If an adhesive is consistently underperforming, increasing exposure time is one of the first adjustments to consider.
Another factor affecting curing time is the distance between the light source and the material. If the lamp is positioned too far away, the intensity of the UV energy decreases, extending the time needed to achieve a full cure. Similarly, if the material has UV-blocking additives or pigments, longer exposure may be required to compensate for reduced light penetration.
Uvitron’s UV curing systems offer precise control over curing duration, allowing users to fine-tune exposure time for optimal results. Whether using a flood curing system for large surfaces or a spot curing system for precise applications, adjusting curing time can help ensure complete polymerization and eliminate the risk of incomplete bonding. For applications requiring fast and consistent results, automated UV curing systems with programmable exposure settings can further enhance curing efficiency.
Overheating or degradation
While UV curing relies on high-intensity light to activate the polymerization process, too much exposure or excessive heat can have the opposite effect. Instead of strengthening the bond, overexposure can degrade the adhesive, causing brittleness, discoloration, or a weakened structure. This is especially true for heat-sensitive materials and formulations designed for precise curing conditions.
Overheating often occurs when UV intensity is too high, exposure time is too long, or the curing environment lacks proper cooling or ventilation. Some adhesives and coatings contain additives or stabilizers that help regulate the curing process, but when subjected to excessive UV energy, these compounds can break down, resulting in reduced flexibility, surface cracking, or yellowing.
In applications where temperature-sensitive substrates are involved, overheating can also damage the material being bonded or coated. Plastics, thin films, and medical-grade components, for example, may warp or degrade under intense UV exposure, compromising the overall integrity of the product.
Uvitron’s precision-controlled UV curing systems are designed to prevent overheating while maintaining maximum curing efficiency. With adjustable intensity settings, controlled exposure times, and cooling options, these systems ensure that adhesives and coatings receive the right amount of UV energy—no more, no less. By optimizing intensity and exposure duration, users can achieve strong, durable bonds without the risk of degradation or thermal damage.
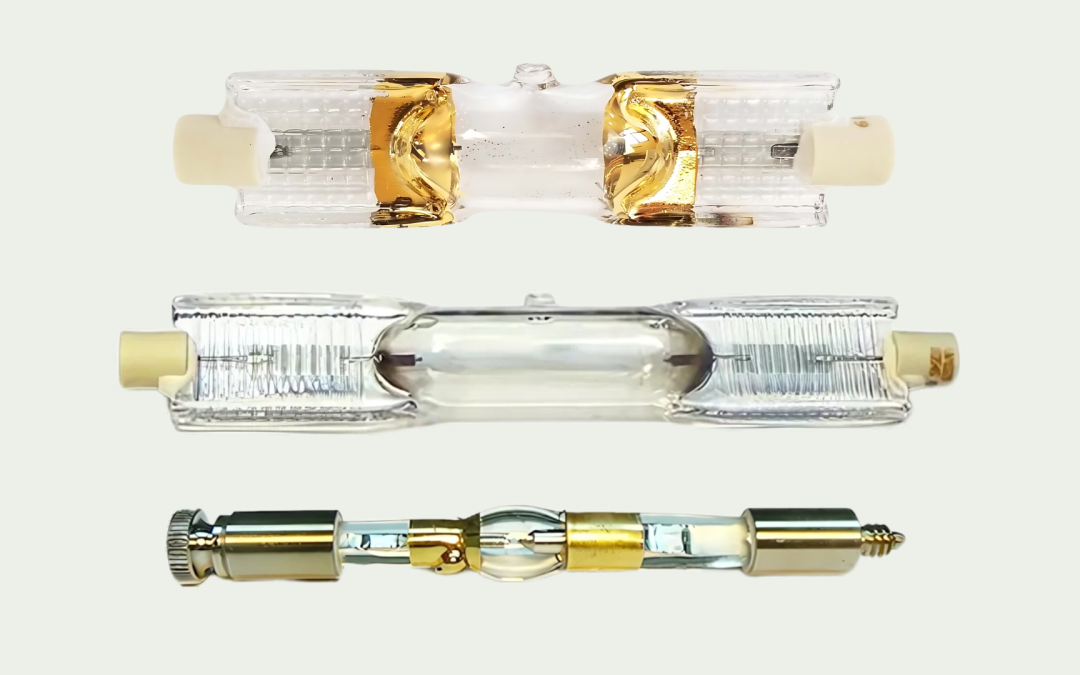
Dec 14, 2024 | Blog
UV curing systems are essential for fast, efficient curing of adhesives, coatings, and inks, providing high-intensity ultraviolet light that triggers polymerization in specially formulated materials. However, while UV lamps are built for durability and precision, they don’t last indefinitely.
Like any light source, UV lamps experience gradual intensity degradation, which can lead to slower curing times, weaker bonds, and inconsistencies in the final product. If not addressed, this decline in performance can disrupt production, increase waste, and result in costly rework. The problem often goes unnoticed until curing failures become apparent, making proactive maintenance and timely replacements essential for sustaining optimal output.
Understanding the factors that contribute to UV lamp wear, recognizing the signs of declining performance, and knowing when to replace or upgrade your system can help prevent unexpected downtime and ensure consistent, high-quality curing results. Whether you’re using a traditional mercury arc lamp or a modern UV LED system, knowing what to expect from your lamp’s lifespan can make all the difference in maintaining efficiency and reliability in your production process.
How long do UV curing lamps last?
The lifespan of a UV curing lamp depends on several factors, including the type of system, operating conditions, and maintenance practices. Traditional mercury arc lamps typically last between 500 and 2,000 hours, while modern LED-based UV curing systems can run for 10,000 to 20,000 hours before experiencing significant degradation. However, actual performance and longevity vary based on several key factors, including on/off cycling, cooling efficiency, and exposure to contaminants like dust, resin buildup, and airborne particles in the curing environment.
Mercury arc lamps, widely used in high-intensity curing applications, gradually degrade over time due to electrode wear and mercury loss. As these lamps age, their UV output diminishes, leading to longer curing times and potential defects in the final product. Frequent on/off cycling can further reduce lifespan, as the thermal stress from repeated ignition and shutdown accelerates component wear. To maximize the life of mercury-based systems, Uvitron’s UV curing units incorporate advanced cooling mechanisms and high-efficiency reflectors that help maintain optimal output for as long as possible.
In contrast, UV LED curing systems offer significantly longer operational life because they don’t rely on electrodes or vaporized mercury. Instead, they use solid-state technology that maintains stable output over thousands of hours with minimal degradation. Although LED systems have a higher initial investment, they reduce the need for frequent lamp replacements, lower energy costs, and provide consistent curing intensity without the fluctuations seen in arc lamps. Uvitron’s SkyWave and SunRay LED curing systems are built for long-term reliability, with adjustable intensity settings and modular designs that allow for easy integration into various curing applications.
Even with the best technology, environmental factors play a crucial role in lamp longevity. Overheating, poor ventilation, or exposure to contaminants can shorten the life of both mercury and LED curing lamps. Regular maintenance—such as cleaning reflectors, checking cooling systems, and replacing filters—can significantly extend a lamp’s usable life and maintain curing consistency.
To ensure maximum performance, Uvitron provides precision-calibrated UV curing systems with intelligent monitoring features that help users track lamp output and schedule timely maintenance. Whether using mercury arc or LED curing, understanding when to replace a lamp or upgrade to a more efficient system is key to preventing costly downtime and ensuring a high-performance UV curing process.
Signs That Your UV Lamp Needs Replacing
Many users don’t realize their UV curing system is underperforming until curing failures, production slowdowns, or material defects become noticeable. Since UV lamps don’t typically “burn out” like conventional bulbs, they can continue emitting visible light even when their UV output has significantly degraded. This makes it crucial to recognize the early warning signs of lamp wear before it starts affecting product quality and process efficiency. If you’re experiencing any of the following issues, it may be time to replace your UV lamp or upgrade to a more efficient system:
Longer curing times
When a UV system is operating correctly, curing happens within a predictable time frame. If materials that previously cured in seconds now take noticeably longer, it’s often a sign that your lamp’s output is declining. This happens as the lamp’s intensity weakens over time, requiring more exposure to achieve the same level of curing. Extended curing times can slow down production, increase costs, and create bottlenecks in high-throughput operations.
Incomplete curing
If adhesives, coatings, or inks remain sticky, soft, or undercured after exposure, your UV lamp may no longer be delivering the necessary intensity. Incomplete curing can result in weaker bonds, reduced durability, and performance failures, especially in industrial, medical, or electronic applications where precision is critical. A failing UV lamp may struggle to provide the right amount of energy, causing patchy curing or uneven surface finishes.
Inconsistent results across batches
Quality control is essential in UV curing, and if you notice variations in bond strength, hardness, or finish quality from one batch to another, a declining UV lamp may be the culprit. Some areas of the material may receive sufficient exposure while others do not, leading to unreliable product performance. This issue is particularly common in high-volume manufacturing, where curing consistency is crucial for maintaining product standards.
Visible lamp degradation
Mercury arc lamps, in particular, are susceptible to wear and physical deterioration over time. If the quartz tube appears cloudy, darkened, or has visible cracks, UV transmission will be significantly reduced, leading to poor curing results. Similarly, aging reflectors can lose their ability to efficiently direct UV light, further diminishing the system’s performance. Regular visual inspections can help catch these signs before they start affecting output.
Manufacturer’s recommended replacement time reached
Even if your lamp still emits light, that doesn’t mean it’s still performing at full capacity. Most UV lamps have a defined operational lifespan, after which their UV output diminishes below functional levels. Following the manufacturer’s recommended replacement intervals ensures that your curing system remains effective and prevents unexpected failures. Uvitron’s UV curing systems are designed with lamp monitoring capabilities that help users track usage hours and schedule timely replacements before performance declines.
How to Prevent UV Lamp Failures
While lamp degradation is inevitable, proactive maintenance can help extend its lifespan and maintain consistent curing results. Routine actions such as cleaning the lamp and reflectors, ensuring proper cooling, and monitoring output levels can significantly improve UV system efficiency. Uvitron’s advanced UV curing solutions include high-output lamps, precision reflectors, and cooling features that help maintain optimal curing performance over time.
If you’re noticing any of these warning signs in your system, it may be time to replace your UV lamp or explore an upgrade to a more efficient curing solution. Contact Uvitron to find the right lamp or system upgrade for your application.
Page 1 of 1012345...10...»Last »